Creating a completely configured deployment environment from scratch
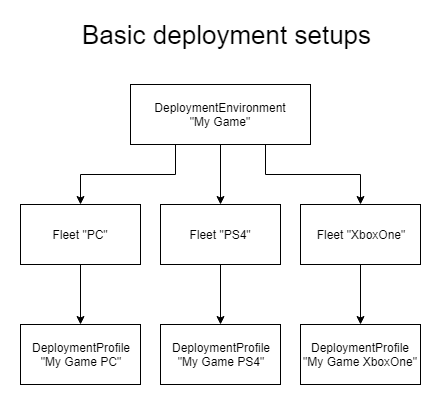
In this example you will be shown how to create and configure a deployment environment for your game. It will have a basic setup with one general purpose Fleet meant to host game servers for a PC build or community. You can easily duplicate this Fleet for other platforms like PS4 or XBOne, or any other platform you want to target. Here is a simple diagram of such a setup:
Note
It is highly recommended to create multiple environments for e.g. Development, Test, Production, etc. For development, a deployment flow that automatically creates and destroys environments is very useful as well.
The following elements will be created in this chapter:
- DeploymentEnvironment
- Fleet
- GameDeploymentTemplate
- UtilityDeploymentTemplate (optional)
- DeploymentProfile
- DeploymentRegion
Deployment Environment
The DeploymentEnviroment element encapsulates all the deployment related configuration elements for your game / application. The element itself is easy to create; you only need to supply a name:
HTTP request
POST /v3/deploymentEnvironment
Request body
{
  "name": "Bluewolf"
}
Response body
[
  {
    "id": "173892217340309897",
    "name": "Bluewolf",
    "createdAt": 1568312996
  }
]
Fleet
This example Fleet represents deployments for a PC platform or community.
Amongst a Fleet's properties is deploymentEnvironmentId. We take this value from the response of previous request, assigning the Fleet to the DeploymentEnvironment we've just created. Other properties like deploymentProfileId, gameDeploymentTemplateId and utilityDeploymentTemplateId can be left empty for now. We will be creating these elements next and add them to the Fleet afterwards.
HTTP request
Request body
{
  "name": "Bluewolf PC",
  "deploymentEnvironmentId": "173892217340309897",
  "deploymentProfileId": "",
  "gameDeploymentTemplateId": "",
  "utilityDeploymentTemplateId": ""
}
Response body
[
  {
    "id": "7420099900751948711",
    "name": "Bluewolf PC",
    "deploymentEnvironmentId": "173892217340309897",
    "deploymentProfileId": "",
    "gameDeploymentTemplateId": "",
    "utilityDeploymentTemplateId": "",
    "operationalStatus": 0
  }
]
The operationalStatus property in the response is 0. This means automatic deployment is disabled. We will enable this in the next chapter, Starting Automatic Deployment after all configuration elements are in place.
Game Deployment Template
The GameDeploymentTemplate element defines which game ApplicationBuild you want to deploy.
HTTP request
POST /v3/deploymentTemplate/game
Request body
{
  "name": "Bluewolf-server PC Game Deployment Template",
  "gameDeploymentTemplateBuild": [
    {
      "applicationBuildId": "2324653987059528218"
    }
  ]
}
Response body
[
  {
    "id": "4748702875218694016",
    "fleetIds": [],
    "name": "Bluewolf-server PC Game Deployment Template",
    "inUse": 0,
    "createdAt": 1568371305,
    "gameDeploymentTemplateBuild": [
      {
        "applicationBuildId": "2324653987059528218"
      }
    ]
  }
]
Utility Deployment Template (optional)
The UtilityDeploymentTemplate describes any utilities (sidecars) you want to deploy onto each host that we deploy game instances onto.
You can indicate whether these should be installed on BM, VM or both and how many per DC location.
HTTP request
POST /v3/deploymentTemplate/game
Request body
{
  "name": "Bluewolf-server PC Utility Deployment Template",
  "utilityDeploymentTemplateBuild": [
    {
      "applicationBuildId": "3801243597300703061",
      "deployOn": 3,
      "installsPerLocation": 0
    }
  ]
}
Response body
[
  {
    "id": "6793353982360875057",
    "fleetIds": [],
    "name": "Bluewolf-server PC Utility Deployment Template",
    "inUse": 0,
    "createdAt": 1568371472,
    "utilityDeploymentTemplateBuild": [
      {
        "applicationBuildId": "3801243597300703061",
        "deployOn": 3,
        "installsPerLocation": 0
      }
    ]
  }
]
Deployment Profile
Next, we create a DeploymentProfile. You create one per Fleet and as such has a 1:1 relation with a Fleet.
This element describes how to deploy your applications. You must set the deployment strategy, minimum deployment figures and the buffer value defining the pool of warm game servers that are ready to be allocated. These are global values that apply per DeploymentRegion and can be overridden on a per-DeploymentRegion basis.
A DeploymentProfile contains the DeploymentRegions that define where to deploy your applications. These are added to the DeploymentProfile afterwards.
HTTP request
Request body
{
  "name": "Bluewolf-server PC Deployment Profile",
  "description": "PC Fleet Deployment Profile",
  "strategyType": 1,
  "minimumCapacity": 0,
  "maximumCapacity": 0,
  "bufferValue": 0,
  "bufferValueType": 0,
  "bufferValueMin": 0,
  "bufferValueMax": 0
}
Response body
[
  {
    "id": "88465290039742335",
    "fleetIds": [],
    "name": "Bluewolf-server PC Deployment Profile",
    "description": "PC Fleet Deployment Profile",
    "strategyType": 1,
    "minimumCapacity": 0,
    "maximumCapacity": 0,
    "bufferValue": 0,
    "bufferValueType": 0,
    "bufferValueMin": 0,
    "bufferValueMax": 0,
    "markedForDeletion": 0,
    "inUse": 0,
    "deploymentRegions": [],
    "createdAt": 1568376027
  }
]
Deployment Region
Next add a DeploymentRegion to the profile we have just created. This tells the platform in which data center(s) you want to deploy your game. Each DeploymentRegion is based on an i3D.net bare metal location (PoP) to which cloud datacenters can be added for the purpose of bursting onto when running out of bare metal capacity.
You can optionally override global DeploymentProfile parameters such as deployment strategy, minimumCapacity and buffer value if desired.
You can repeat this step for all the DeploymentRegions you want to create in your profile.
HTTP request
POST /v3/deploymentProfile/88465290039742335/deploymentRegion
Request body
{
  "name": "EU: Rotterdam",
  "i3dDcLocationIds": [
    6
  ],
  "containers": [
    {
      "containerLocations": [
        {
          "cloudProviderId": 31,
          "dcLocationId": 63,
          "primaryInstanceTypeName": "n1-highcpu-64",
          "secondaryInstanceTypeName": "n1-highcpu-32",
          "cpuPlatform": "Intel Broadwell"
        }
      ]
    }
  ]
}
Response body
[
  {
    "id": "2468882381297501628",
    "name": "EU: Rotterdam",
    "i3dDcLocationIds": [
      6
    ],
    "i3dDcLocationIdsToBeRemoved": [],
    "minimumCapacity": null,
    "maximumCapacity": null,
    "bufferValue": null,
    "bufferValueType": null,
    "bufferValueMin": null,
    "bufferValueMax": null,
    "strategyType": null,
    "markedForDeletion": 0,
    "containers": [
      {
        "id": "345414563890737521",
        "markedForDeletion": 0,
        "containerLocations": [
          {
            "id": "403382638377965874",
            "cloudProviderId": 31,
            "dcLocationId": 63,
            "primaryInstanceTypeName": "n1-highcpu-64",
            "secondaryInstanceTypeName": "n1-highcpu-32",
            "cpuPlatform": "Intel Broadwell",
            "markedForDeletion": 0
          }
        ]
      }
    ],
    "inUse": 0
  }
]
Finalize the Fleet
Finally we can assign the previously created DeploymentTemplates and DeploymentProfile to the PC Fleet from earlier.
HTTP request
PUT /v3/fleet/7420099900751948711
Request body
{
  "deploymentProfileId": "88465290039742335",
  "gameDeploymentTemplateId": "4748702875218694016",
  "utilityDeploymentTemplateId": "6793353982360875057"
}
Response body
[
  {
    "id": "7420099900751948711",
    "name": "Bluewolf PC",
    "deploymentEnvironmentId": "173892217340309897",
    "deploymentProfileId": "88465290039742335",
    "gameDeploymentTemplateId": "4748702875218694016",
    "utilityDeploymentTemplateId": "6793353982360875057",
    "operationalStatus": 0
  }
]
Everything you need to start your first deployment is in place! For examples on how to start deploying your first instances, continue with the next example: Starting automatic deployment