Game deployment environment, profile, and fleets introduction
This document introduces you to the three concepts of the deployment configuration hierarchy. Next, you will learn how to create your own environment, profile, and fleets in the dashboard.
- Deployment environment: The deployment environment is the top most element in the deployment configuration hierarchy. It is normally used to reflect a game title that you host on our platform, split up into development, testing, and production environments.
- Fleet: The Fleet is the second layer within the deployment configuration hierarchy, which represents a collection of hosts (Bare metal or Virtual machines). You can have as many Fleets under a deployment environment as you like. There are no limits.
- Deployment profile: The deployment profile is the main element that determines how your application instances will be deployed.
Create your deployment environment
It's recommended to create an environment per title. Additionally, it's advised to separate your live environment from any development environments. When you separate the environments, changes and experiments done for development purposes in a development environment won't affect your live environment. Within a game deployment environment, you can create multiple Fleets in case you want to separate for different platforms such as PC, PS4, Xbox, Switch, and more.
- Go to Game Hosting > Deployments.
- Click Create enivronment.
- Enter your Environment Name.
- Click Create.
Create your deployment profile name
A deployment profile is always the only child of a fleet. You can only have one deployment profile per fleet.
- Go to Game Hosting > Deployments.
- Select the Profiles tab.
- Click Create Profile.
- Enter the Name of your profile.
- Click the floppy disc icon.
- Follow the steps to Create your deployment profile settings.
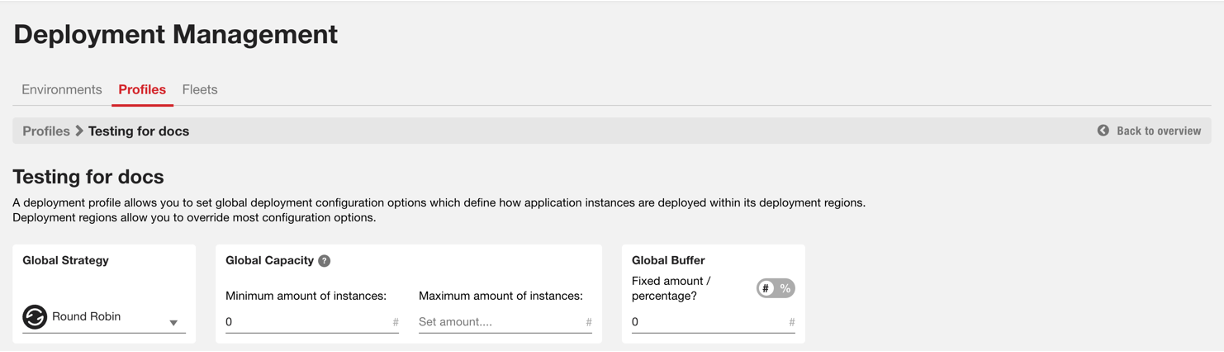
Create your deployment profile settings
- After you have created your deployment profile name, click the cog icon to the right of the profile name to set your Profile settings.
- On the Profile page, the default Global Strategy setting is Round Robin. For more information about the Round robin strategy, see Automatic scaling.
- To define the amount of instances you want to deploy in a specific region, enter your Miniumum amount of instances and Maximum amount of instances in the Global Capacity section.
- Enter Fixed amount or percentage in the Global Buffer section. If you select a percentage, enter the Minimum and Maximum percentage.
- Next you will need to create your region. Follow the steps below.
Create your deployment region
This defines a geographical region that contains one or more i3D.net data center (dc) locations.
- On the Profile settings page, click Create region.
- On the Create Region pop up window, select at least one i3D.net location and click Next.
- Enter the Region Name and click Create.
- Follow the steps below to Add Bare Metal locations and cloud groups.
Add Bare Metal locations
- Click the cog wheel icon next to the deployment region you just created. This will bring you to the region settings page.
- To add location to a Bare Metal Group, Click Add location.
- On the Add Bare Metal Location window, select your location.
- Click Save.
Add cloud groups
A cloud group is a wrapper that holds multiple cloud locations to burst towards when your bare metal pool runs dry.
- Click Add cloud location.
- On the Add Cloud Location window, select your Cloud provider from the drop down list.
- Select your Location from the drop down list.
- Select your Primary instance from the drop down list.
- (Optional) Select your Secondary instance from the drop down list.
- Click Add location.
- (Optional) To add more cloud locations, click the Add Cloud location button.
- Click Save.
Create your fleets
Fleets are normally used to differentiate between different builds or platforms such as PC, Xbox, Playstation, Switch, and more. But you can use fleets to deploy instances for temporary or testing purposes while keeping these separate from other fleets.
- Go to Game Hosting > Deployments.
- Select the Fleets tab.
- Select your Deployment Environment that you want to add the fleet to from the drop down list.
- Click Create fleet.
- On the Create Fleet window, your selected Deployment Environment is already auto-populated, but if you need to select a different one, you can do that by clicking the arrow and select one from the drop down list.
- Enter the Fleet Name.
- Select your Deployment Profile from the drop down list.
- Select your Game Template from the drop down list.
- If you are using your fleets for other templates, select Utility Template, Dependency Template, or Host Capacity Template if it applies.
- Click Next.
- Click Create.
Enable your deployment
After you have set your Minimum Capacity on your Deployment profile to anything higher than 0, then you can see the instance being deployed and online on the Instance Management page.